Updated Dec 1, 2020
Before continuing you will need to be sure you are using the latest Universal Control and Firmware for your StudioLive:
StudioLive Series III Console - Firmware Update
StudioLive Series III Rack mixer - Firmware Update
Universal Control can be downloaded here:
https://www.presonus.com/products/UC-Surface/downloads
---------------------------------------
Like many non-DAW audio programs, Zoom accepts audio on USB channels 1 and 2. If you are using an interface the setup is fairly simple. With a much more feature heavy live sound / studio mixer, setup will be a little different.
Windows Setup
If you plan to use more than the first two channels during your meeting, you will need to send your Main left and right signal to your USB 1 and 2 sends. Doing this grants you fader control over the main and individual channel signal sent to Zoom.
To setup USB sends on an SL rack or console using Universal Control:
- Open Universal Control.
- Click on the picture of your mixer.
- When the fader view opens, click the gear in the upper right corner.
- Click the Digital Patching tab.
- Click USB Sends.
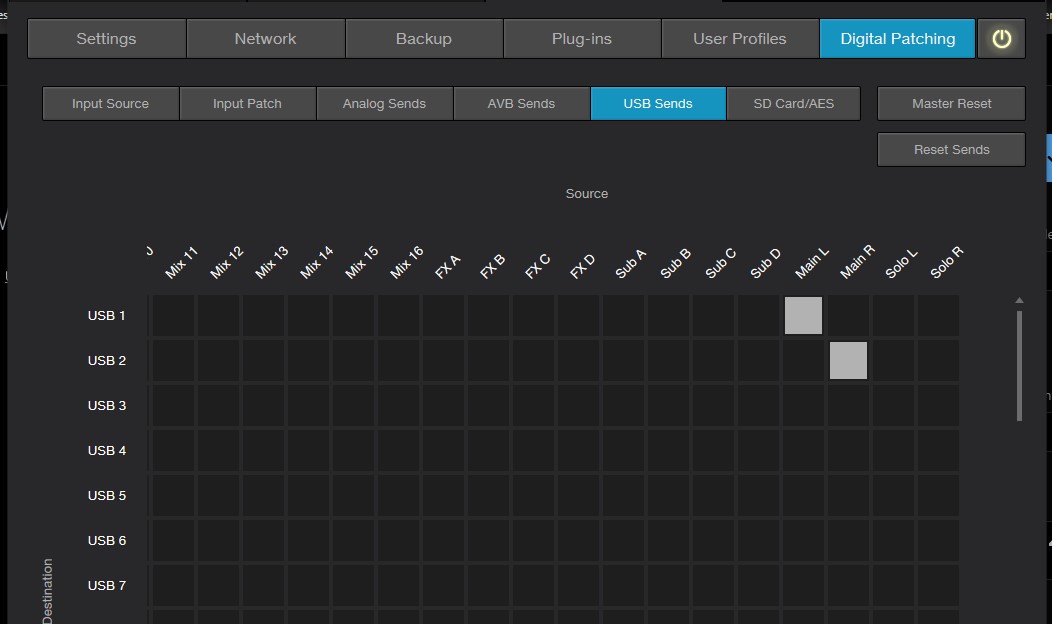
- Scroll to the right until you see the Main Left and Main Right rows.
- Select the corresponding squares to align USB 1 / Main Left, USB 2 Main Right
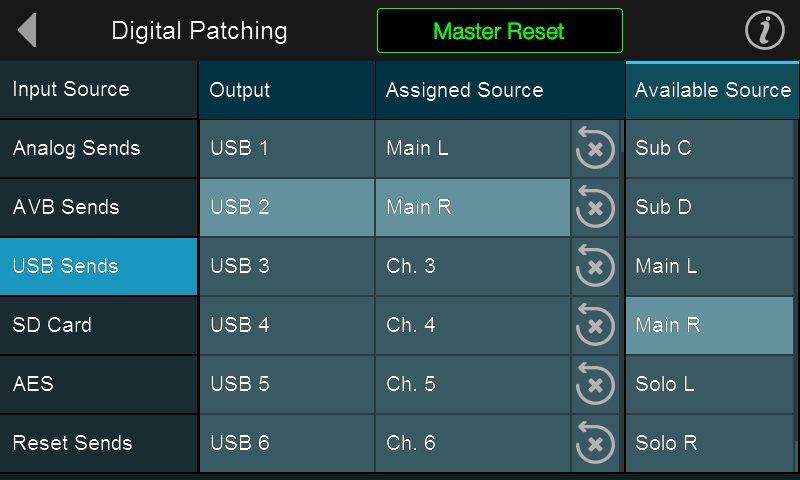
To setup USB sends on an SL console touch screen:
- Press the Home button.
- Touch Audio Routing on screen.
- Touch Digital Patching on screen.
- Touch USB Sends in the input source column. USB 1 / Ch. 1 will be highlighted
- Touch Available Source.
- Scroll down until you see Main L
- Touch Main L and it will appear next to USB 1 as the Assigned Source
- Touch USB 2 in the Output column. This will highlight USB 2 / Ch. 2
- Touch Available Source.
- Scroll down until you see Main R.
- Touch Main R and it will appear next to USB 2 as the Assigned Source.
You will still be able to use your channel one and two inputs for your meeting.
If you have previously configured your return audio, it will still come back on the Tape In channel. If you have NOT configured return audio, please follow the instructions at the link below:
---------------------------------------
Mac setup
Your USB sends will be setup the same as Windows, you will need to send your Main left and right signal to your USB 1 and 2 sends.
The return audio will need to be setup a little different.
On Mac the Zoom program does not follow the return 37/38 audio routing assignment and returns on channels 1/2 USB. This is governed by the Zoom program and cannot be altered at the time of this publishing.
Your channel 1 and / or channel 2 will need to be set to USB. This means you will not be able to use inputs 1 and / or 2 on your console or rack mixer.
To set USB returns to Ch. 1 / Ch. 2 on an SL rack or console using Universal Control:
- Open Universal Control.
- Click on the picture of your mixer.
- When the fader view opens, click the gear in the upper right corner.
- Click the Digital Patching tab.
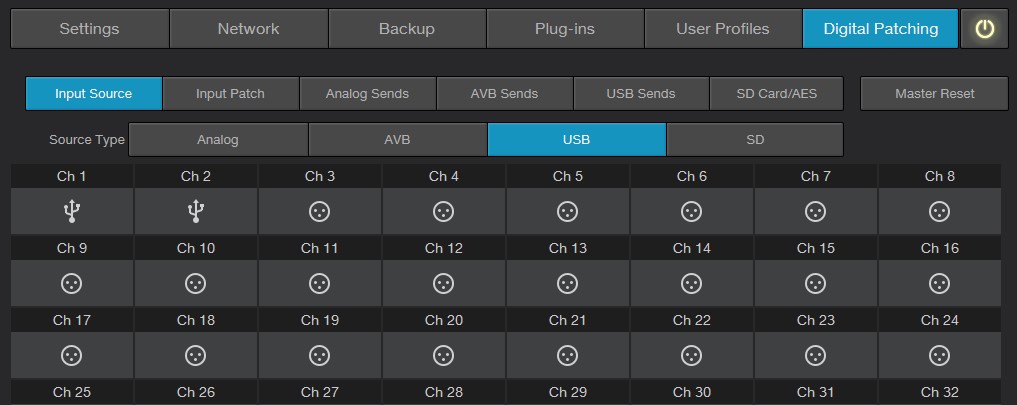
- Click USB in the Source Type row.
- Click in the square under channel 1 and 2 to change them to USB return.
To set USB returns to CH. 1 / Ch. 2 directly on a Console:
- Press the select button above the Channel 1 fader.
- In the Fat Channel Control section, press the USB input button.
- Repeat for channel 2 if you desire.
You will now control your Zoom audio on channels 1 and 2.
Happy Zooming!
==================================================================
Please contact PreSonus Technical Support by creating a Support Ticket at My.PreSonus.com/Support for further assistance.
>How to create a support ticket<