Editing Tracks
Sizing Tracks
Tracks in the Track Lane can be sized with the Arrow tool, as described in the Size an Event section of the Editing chapter in the manual. The relative sequencing of all other Tracks in the Project is maintained when any Track is sized. Note that a Track cannot be sized to less than four seconds in length, per the Red Book CD standard.
Volume Envelope Editing
Each Track in the Track Lane features a volume envelope, which can be edited like the volume envelopes of Audio Events, as described in the Adjust Audio Event Volume Envelopes section of the Editing chapter in the manual. A volume envelope lets you create fade-ins and fade-outs.
Crossfading Overlapping Tracks
When a Track is manually moved across the Timeline so that it overlaps in time with another Track, it is possible to crossfade the two Tracks so that one fades out as the other fades in. To crossfade overlapping Tracks, select the two Tracks and press [X] on the keyboard. A linear crossfade is drawn that can be edited by clicking-and-dragging on each Track’s fade handle.
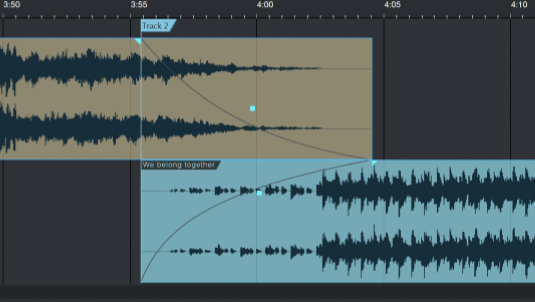
Any Track that begins after another Track in time is normally the beginning of a new track on a CD or other medium. Its starting position serves as the beginning of the track, regardless of the timing of crossfades. If you want to change the point at which the new CD track begins, simply drag the song marker to a new location within the overlapping range.
Splitting Tracks
To split any Track, set the playback cursor where you want the split and press [Alt]+[X] on the keyboard. The resulting two Tracks can now be edited like any other, including editing meta-information in the Track column. Splitting a Track for a Song does not adversely affect the ability to automatically update that Song's mastering file, so it is possible, for instance, to split a long live performance into many Tracks in a Project and still edit the related Song normally.
Note it is not possible to split a Track where the resulting two Tracks would not be at least four seconds in length, per the Red Book CD standard.
Enabling and Disabling Tracks
Any Track can be disabled at any time. Disabling a Track removes the Track from the Timeline but keeps the Track in the Track column, with the label “This Track is disabled.” This is helpful if you need to remove a Track from the Project timeline but are unsure of whether the Track should be removed completely.
To disable any Track, select it in the Track column and choose Disable Track from the Project file menu. To enable a disabled Track, select it and choose Enable Track from the Project file menu.
Track Markers
All Tracks in a Project automatically have a Track marker attached to the beginning of the Event in the Timeline. It is possible to manually insert other Track Markers by floating the mouse between the Timeline ruler and the Track lanes until the Arrow tool turns into the Marker tool, then simply clicking where you want to put the Track Marker. Manually inserted Track Markers are green in color, while automatically placed markers are blue in color. Track Markers can be moved across the Timeline by clicking-and-dragging left or right.
Note that Track Markers are only used when burning a CD, or exporting an image file or DDP file. When exporting a digital release, manually placed Track Markers are ignored, and separate files are only rendered for actual Tracks, as listed in the Track column.